
Sunday, November 13, 2011
Thomas the Train
Quick Idea for Receiving Blankets

So have you ever wondered what to do with those receiving blankets you receive, that your little one grows out of in the first couple of months? This is one idea I had. This was a 4 pack that I had received for my baby shower for Wesley. I sewed them together to make one large blanket. I primarily used it for his stroller; to cover him up, to block out the sun. Dave came across this and I washed it up to give away...I just can't part with it.
Saturday, August 13, 2011
Get Well Card
 Dave's wonderful 95 year old grandmother "Gigi" took a bad fall last month. She hit her head and now she has to live in a nursing home. She is doing much better, Thank God! I wanted to cheer her up so I sent this card with a ton of photos of the boys.
This card was super simple to make. Two different colors of cardstock, simple ribbon...tied using my Bow Easy. I printed Get Well Soon on the computer and popped it up and added a brad...see, super easy.
Anniversary Card
 This year my parents celebrated their 48th wedding anniversary. What good role models I have. I wanted to do something special for them and I saw this idea in an issue of Scrapbooks Etc. Magazine. I had purchased the paper at the Convention in Arlington in June for our big RV trip that we took. When I saw this car, I knew the paper was perfect. Happy Anniversary was cut out of Beyond Birthdays cartridge at 1 1/2". My parents were thrilled with this card.
Football Vinyl Water Jug and Cooler
Today is the first day of football in our crazy obsessed football Texas town. Riley is on a new team this year and I wanted to make it fun for him. We purchased the water jug and cooler in his new team colors and I knew from the moment I saw them I would vinyl them.
This is my second time using vinyl and the Cricut. This time was much easier than the first...seeing how I did it 2 years ago and I did not like working with it. I used Plantin Schoolbook and cut the letters out at 1". The # was cut out at 3/4" and the 83 was cut out at 1 1/2". I really love the way this looks. The football was cut out of Sports Mania at 3".

 I wanted to put the vinyl on the white of the cooler to make it pop.
 Another angle of the cooler.
Wednesday, July 20, 2011
Get Well Card

My nephew, Caleb, had surgery last Friday. He was born with a Cleft lip and Cleft palette. He is 10 years old and I believe this is his 4th surgery. This one was the big one, they take his hip bone and attach to the palette. He is doing great, recovering well. I made this card for him. It is supposed to look like a Band aid. My son, Bradley was playing around with my Big Shot one day and came up with this idea. I thought it was so cute, I kept it in the back of my mind for Caleb.
I cut the Band aid with a paper trimmer and used Swiss Dots. The "Get Well Soon" came from Beyond Birthdays Cricut cartridge. I don't think he has received it in the mail yet. I also sent a video game to help his recovery :) What a bummer summer for him!
Soccer Birthday Pull Card
 My nephew is a really good soccer player,even though I have never seen him play...I have heard :) He turned 14 and is playing for a select soccer team...I am so proud of him. I decided to make this card for his birthday. It is a pull card and I got this idea when I went to the Scrapbook Convention in Arlington, Texas. Art Gone Wild had a booth at at the show and they were demonstrating this technique. I fell in love instantly and bought the template...sucker!!! The boy is cut out of EDPD at 3 1/2", face is Peachy Keen Stamps. The large soccer ball pull is cut out of Sports Mania at 2 ".
 You pull the soccer ball which reveals another Sports Mania soccer ball cut at 1 1/2"...I know, I know...2 soccer balls. I origianally put everything together and was just going to use a square scrap of paper as the pull and then thought the soccer ball pull was cuter.
 Pull yet again, and I cut the goal..he is a goalie :) out of EDPD at 1 1/2" along with the flag and cone, also 1 1/2". I did cut the flag and cone twice so I could make a white pole.
 This is where I put the sentiment that I computer genterated...all about computer generating. Then on the back side (I did not make this a folded card, I made it a flip over card) I made a Gift Card holder pouch to slide money into.
Okay, so when I had this card in my hands and looking at how cute it turned out, I did not notice that you see the naked backside of the Paper Doll. I only noticed it in the pictures. I don't know if on my future ones I will try to make clothing or leave them naked!
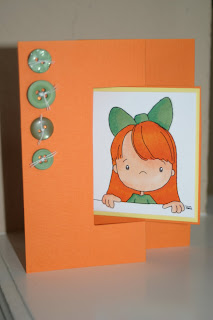
Pool Door Sign
 We have lived in Texas for 3 years now...I can't believe it. Dave and I decided we would not go another summer without a pool. In May our pool was finished...just in time!!!! When we invite friends over, I am constantly looking out the front door, so I thought I would make this sign.
I bought a wood frame from Michaels ($1), I found the pool paper at Hobby Lobby and Modge Podged it to the frame. This was my first attempt with Modge Podge and it stuck to the newspaper...thus...the buttons. I was so bummed, but I love the buttons now! I drilled 2 holes into the frame, attached the ribbon, hang it on the front door when we are outside...and voila...I can enjoy the pool while waiting for friends.
 This little boy is a digi stamp from Tiddly Inks. This looks exactly like Wesley...the orange floaties in the pool. In fact all 3 of the boys wore these orange floaties. When I colored him, I used Glossy Accents on the goggles to give them a shiny affect. I then Modge Podged him to the frame. You can't even tell I did the Glossy Accents. The saying I did on the computer...nothing fancy!
Friday, June 24, 2011
Happy BeerDay
 Summer is in full swing here in Texas...hot, hot, hot!
 Thought I would start this one with a cool drink!
I have a lot of men in my life; husband, father, brothers, cousins, nephews...etc and I found this stamp from Stamping Bella. I am slowly learning how to make masculine cards.
I used Copics to color the image. Love the little lime. I pop dotted the label and lime to give it depth. The green cardstock is Swiss Dots on the Big Shot.
I used Copics to color the image. Love the little lime. I pop dotted the label and lime to give it depth. The green cardstock is Swiss Dots on the Big Shot.
All you men that have not had your birthday yet this year...this is coming!
Tuesday, May 3, 2011
St. Patty's Day Card
Alright, I know St. Patty's Day card in May? I should be doing a Cinco de Mayo, but you are getting St. Patty's Day. I said I am way behind.
I learned how to do this Swing Card from the Internet. My new favorite card to make. The image I used is Tiddly Inks. I think she does the sweetest images. I used Copics for the coloring, some of the techniques I learned in my class...love the way her hair turned out.
This is an Irish Blessing I absolutely love that I found on the Internet and computer generated it. You can by the stamp, but I like that I can alter the font and size. The shamrock stamp I purchased at the dollar bin at Joanns. Love deals.

Car's Birthday Card
I think it is about time I finally posted something. I am so far behind that one of these days I am going to have about 10 posts just to catch up.
Wesley turned 3 in March and it is now May...yep, a little behind. Wesley is a Cars maniac. So much that he has a certain McQueen he carries around everywhere with him. He tubs with it, eats with it, watches TV with it...even sleeps with it. So I thought it would be appropriate to make him a McQueen card.
I cut McQueen at 7" using the Disney Cars cartridge. The bigger the better, lots of little layers. I ended up cutting one day and putting together another day. I also cut the Paper doll at 4" from EDPD. The car that the boy is holding, the image on the shirt and the images on the shoes were all photos I downloaded from the internet.

See I told you he holds that car everywhere! I also make the boys giant signs so when they wake up in the morning they see it. All done on the computer. The picture of him in front of the sign did not turn out so well.

He loved the card and it is sitting on his dresser until I can get it into his Birthday Scrapbook. Seeing how I am 3 years behind on his book, it will be there for awhile :)
Saturday, February 12, 2011
Valentine's

This year, Riley came up with this Valentine. I took my Copics class not too long ago and I purchased the Edward stamp from The Greeting Farm for my upcoming Twilight Cricut Swarm. Riley saw the stamp and said, "Hey that looks like me!" He wanted to use my Copics to color it and I crushed that idea quickly. He colored the boy and girl with Crayola markers and I colored the skin with the Copics, Edward was done in E50 and Ebony was done in R00. Ebony is a digi stamp from The Greeting Farm. Riley chose the colors and he colored 10 of each. I am very impressed how these came out. All the sentiments are computer generated. On the backside of the card he attached a Blow Pop with tape. I am very proud of him...and they are done!!!!!
I am still working on the teacher's valentines. I will not post those until after Valentines!
I'M Nuts and Bolts!

I try to make the boy's Valentine's cards every year. I have a lot of fun with it, but this year...I took on quite the project. I got this idea from an issue of Scrapbooking Etc. magazine. The paper I picked up at Hobby Lobby in the Clearance bin and Bradley loved it. Those are little Hersey bars in the belly. Now for the googly eyes. I used 3 different glues. The first 2 glues, the eys just popped off, finally, I used a glue gun. Thank goodness it worked because I was ready to trash these things...21 cards, 42 googly eyes, x 3...aaaahhhh! Anywho, Bradley loved them and cannot wait to give them out on Monday!
Monday, February 7, 2011
Copic Markers Carrier
 I have an issue, I am addicted to Crystal Light. Not all Crystal Light...just the Strawberry, Orange, Banana flavor. I have now gone to 4 different grocery store chains and they are no longer carrying my flavor. I am very disappointed. Anywho, I was originally going to keep the containers to make luminaries with the battery operated candles and mod podge and Cricut cuts. But I came up with this instead.
 I needed something to carry my pens to the Copic Class I was attending and they worked great. In the pictures, I have the containers for each class. But now, at home, I have them arranged by color group: E, R and RV, Y and YG and YR...etc. I love that they lay on the side, even though you do not have to keep Copics on their side. I am going to Vinyl the color codes on the lid, but I have not had a chance yet...only have white vinyl and want to do it in black.
Copic Class
 A couple of weekends ago, I was able to take a Copic Markers Basics class and a Skin and Hair class. It was so amazing. I had the most amazing instructor, Frank V. He was amazing. Have I said amazing enough? Anywho, these are the 4 cards I made in the class. These 2 are from The Greeting Farm. I even colored the Pima Flowers with Copics.
 These 2, I believe are My Favorite Things Stamps. I learned so much. I have been having so much fun coloring now. It is very therapeutic. Especially after 4 snow days here in North Texas.
I also found a really great site that you can get the Copic Ciaos for a great price. http://www.merriartist.com/ They are very fast at shipping.
I now have a new obsession. One of these days, I will get back to scrapbooking...I hope :)
Monday, January 31, 2011
Cricut Swarm
 My friends and I all have little ones. Not exactly easy to get to a crop and the closest store to us is over 30 minutes away. I decided to hold a Cricut Swarm at my house. Now, I cannot just have friends over, I always have to do something more.
I created this banner using my DS, string that looks like shoelaces, Tags Bags Boxes & More cart, Pooh Font Set cart and lots of pop dots.

Each place setting had some little goodies for the girls. I downloaded the Cricut Cutting Guide from Obsessed With Scrapbooking. I have had this guide taped to the inside of my Expression for the last year and I love having it. So I gave one to each girl. The brown bag is for the paper scraps and the cupcake is actually fuzzy socks. I got this recipe from Rachie's Scrapspot. She even has the cut files you can download to your DS. Instead of the little pom pom for the cherry, I added a Hershey's Kiss. What girl does not love a little cozy and some chocolate?
 These are the girls. Dave was out of town, don't tell him that is his pool table under all that :)
We had 2 tables with everyone's Cricuts and carts on them, an inspiration corner and munchies on the bar. We also listened to 90's music all night long, felt like we were in college again...yes I am dating us :)
Watch for us in February, we are going to have a Twilight Cricut Swarm !
Look What We Made

I bought the SpongeBob cartridge from one of the sites that was having a huge sale. Not that I love SpongeBob, he makes the most annoying sounds, but my boys love to laugh at me when he is on :) Bradley and Wesley wanted to make SpongeBob, we cut him out at 7". Lots and lots of layers. Bradley did a fantastic job putting him together. I had to help Wesley. Next time I think I want to cut him out even bigger.
"Beary" Happy Birthday Card

This year, I decided that I am going to make all my Birthday cards for family and friends. Dave and I both have large families. What have I gotten myself into :) I have always wanted to create a sweet little face like this, and now I can. Thanks to ScrapBookEden. Step by step directions. It is wonderful.
The bear I created on DS using Plantin Schoolbook, just paper piecing. I chalked the edges. I use real blush for the cheeks. I would love to think people will keep my cards forever. With the exception of my Mom, I know they go in the trash :) The sentiment is done on the computer so I can change the color of the "Beary" to match the rest of the card. The glittery paper and ribbon, I got out of the $1 bin at Target. I really did have a lot of fun creating this little bear.
Lego Clock

I am always looking to make something special for my boys on their birthdays. This year for Bradley, I made this Lego Clock. We already have the digital Lego Clock that you buy, but I wanted to do this for him so he could learn how to tell time and make it fun.
I got this clock free at Kohl's when they had their B1G1 free sale. The clock is wood, I pillaged our Legos and sat down with some Gorilla Glue. Bradley loved this and wanted to build off this, but since I hung it on the wall, he cannot :)
Lego Birthday Card


 First I need to start out with an apology. I just searched all my Favorite Blogs for where I got this idea. You know when you think, "Oh I will remember that!"? Well I never "remember that". Anywho, when I remember where I got it from I will let you know...and give the wonderful creator credit.
I made this card on my DS using Plantin Schoolbook for the shape and Printing 101 for the HAPPY puzzle pieces. The little boy is cut from EDPD at 4" and the face is PKS. The Legos are pop dotted using a standard hole punch. I could not figure out the shirt to give Bradley and finally remembered what Bradley's favorite shirt is. Every Friday he "absolutely has to wear" his school spirit shirt. His birthday fell on Friday. He loved this card. The shirt came out so perfect.
Lego Cake

Another Year...Another Lego Birthday! Of course Bradley wanted another Lego birthday cake and this is what I came up with this year. Yes there is a lot of frosting...I am a frosting freak. I would rather have frosting shots than the cake :)
I used 2 9x13 cakes. I cut the bottom one in half and the top one in thirds. For the posts I used a mini muffin tin. I was going to use a third box of cake, but I thought that would be too much leftover cake. I only filled up 6 cups from the second batch of cake mix. He turned 6, thus the 6 posts.
Anywho, he loved the cake and and we all had fun seeing what color our tongues were in the end!
Wednesday, January 5, 2011
Christmas Thank You Cards


I made a pack of three of these cards for a door prize for my MOPS group and I made another 3 pack for myself because I love the way they turned out. So did the boys so we ended up giving the cards to the boys teachers with their holiday gifts. They loved them.
I was inspired for this card from Gigi. I thought this was the cutest thing ever. I made the cookie sheet on the DS using George, the gingerbread were made from Paper Doll Dress Up and the spatula was from Everyday Paper Dolls. Of course the faces are Peachy Keen stamps. The hearts, I used Glossy Accents. The sentiment is computer generated. When you cut the gingerbread people it will cut the mouth, eyes and lines. I just flipped the gingerbread over and stamped my PKS image.
Subscribe to:
Comments (Atom)